Tutorial
Before we start the tutorial, let first address the single most important thing - If you are reading this, You are awesome
Let’s begin
Note
Each step in the tutorial will continue and add from the last step.
Installing ruruki
Lets first create an environment where we can install ruruki and use it.
- We will do this using a python virtual environment.
$ virtualenv-2.7 ruruki-ve
New python executable in ruruki-ve/bin/python2.7
Also creating executable in ruruki-ve/bin/python
Installing setuptools, pip...done.
Install the graph database library into the newly created virtual environment.
$ ruruki-ve/bin/pip install ruruki
Collecting ruruki
  Downloading http://internal-index.com/prod/+f/2e6/c4263fb2b546a/ruruki.tar.gz
Installing collected packages: ruruki
  Running setup.py install for ruruki
Successfully installed ruruki
Creating a database
Note
Please keep in mind that the library is only installed into the virtual environment you created above, not your system-wide Python installation, so to use it you’ll need to run the virtual environment’s Python interpreter:
$ ruruki-ve/bin/python
- Let’s start with first creating the graph.
>>> from ruruki.graphs import Graph
>>> graph = Graph()
- In order to use the
IGraph.get_or_create_vertex()andIGraph.get_or_create_edge()effectively we should create some constraints to ensure uniqueness.
# Ensure that vertices/nodes person, book, author, and category have a
# unique name property.
>>> graph.add_vertex_constraint("person", "name")
>>> graph.add_vertex_constraint("book", "name")
>>> graph.add_vertex_constraint("author", "name")
>>> graph.add_vertex_constraint("category", "name")
Adding in some data
Now that we have a empty graph database, lets start adding in some data.
- Create some nodes. Because we added uniqueness constraints above, we can use
the
IGrapph.get_or_create_vertex()method to ensure we don’t create duplicate vertices with the same details.
# add the categories
>>> programming = graph.get_or_create_vertex("category", name="Programming")
>>> operating_systems = graph.get_or_create_vertex("category", name="Operating Systems")

# add some books
>>> python_crash_course = graph.get_or_create_vertex("book", title="Python Crash Course")
>>> python_pocket_ref = graph.get_or_create_vertex("book", title="Python Pocket Reference")
>>> how_linux_works = graph.get_or_create_vertex("book", title="How Linux Works: What Every Superuser Should Know", edition="second")
>>> linux_command_line = graph.get_or_create_vertex("book", title="The Linux Command Line: A Complete Introduction", edition="first")

# add a couple authors of the books above
>>> eric_matthes = graph.get_or_create_vertex("author", fullname="Eric Matthes", name="Eric", surname="Matthes")
>>> mark_lutz = graph.get_or_create_vertex("author", fullname="Mark Lutz", name="Mark", surname="Lutz")
>>> brian_ward = graph.get_or_create_vertex("author", fullname="Brian Ward", name="Brian", surname="Ward")
>>> william = graph.get_or_create_vertex("author", fullname="William E. Shotts Jr.", name="William", surname="Shotts")

# add some random people
>>> john = graph.get_or_create_vertex("person", name="John", surname="Doe")
>>> jane = graph.get_or_create_vertex("person", name="Jane", surname="Doe")
- Create a relationships between vertices created above. Again notice the use of
IGraph.get_or_create_edge()to ensure uniqueness between the head and tails for the particular edge labels being created.
# link the books to a category
>>> graph.get_or_create_edge(python_crash_course, "CATEGORY", programming)
>>> graph.get_or_create_edge(python_pocket_ref, "CATEGORY", programming)
>>> graph.get_or_create_edge(linux_command_line, "CATEGORY", operating_systems)
>>> graph.get_or_create_edge(how_linux_works, "CATEGORY", operating_systems)

# link the books to their authors
>>> graph.get_or_create_edge(python_crash_course, "BY", eric_matthes)
>>> graph.get_or_create_edge(python_pocket_ref, "BY", mark_lutz)
>>> graph.get_or_create_edge(how_linux_works, "BY", brian_ward)
>>> graph.get_or_create_edge(linux_command_line, "BY", william)

# Create some arbitrary data between John and Jane Doe.
>>> graph.get_or_create_edge(john, "READING", python_crash_course)
>>> graph.get_or_create_edge(john, "INTEREST", programming)
>>> graph.get_or_create_edge(jane, "LIKE", operating_systems)
>>> graph.get_or_create_edge(jane, "MARRIED-TO", john)
>>> graph.get_or_create_edge(jane, "READING", linux_command_line)
>>> graph.get_or_create_edge(jane, "READING", python_pocket_ref)
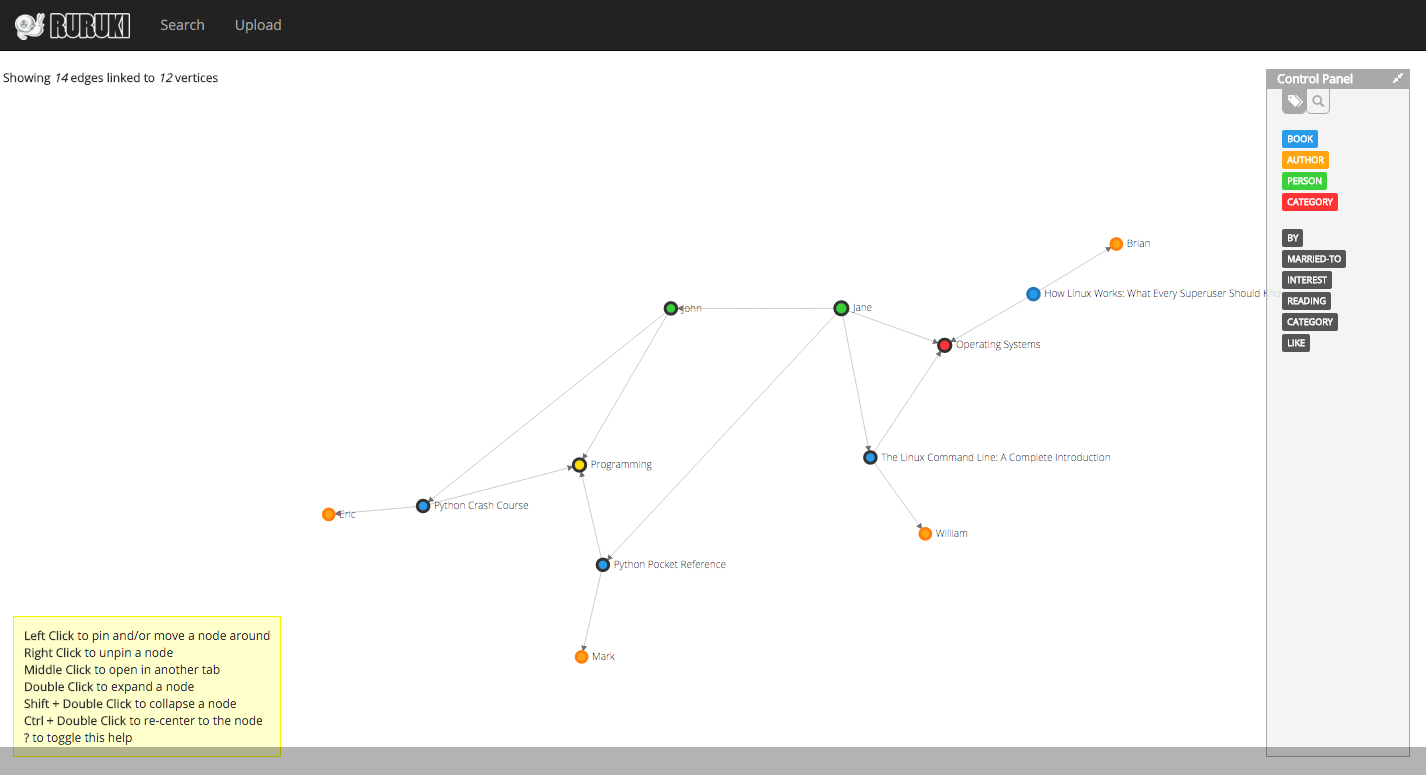
Below is a visualization of the graph so far
Searching for information
Let’s start searching and looking for data.
Note
The examples below only demonstrate filtering and searching on vertices, but the same operations can be applied to edges too.
- Find all people.
>>> print graph.get_vertices("person").all()
[<Vertex> ident: 10, label: person, properties: {'surname': 'Doe', 'name': 'John'},
 <Vertex> ident: 11, label: person, properties: {'surname': 'Doe', 'name': 'Jane'}]
- Finding all help and reference books.
>>> result = graph.get_vertices("book", name__contains="Reference") | graph.get_vertices("book", title__contains="Crash Course")
>>>> print result.all()
[<Vertex> ident: 4, label: book, properties: {'name': 'Python Pocket Reference', 'title': 'Python Pocket Reference'},
 <Vertex> ident: 2, label: book, properties: {'name': 'Python Crash Course', 'title': 'Python Crash Course'}]
- Finding all python books excluding crash course books.
>>> result = graph.get_vertices("book", name__contains="Python") - graph.get_vertices("book", title__contains="Crash Course")
>>>> print result.all()
[<Vertex> ident: 4, label: book, properties: {'name': 'Python Pocket Reference', 'title': 'Python Pocket Reference'}]
- If you already know that identity number
>>> print repr(graph.get_vertex(0))
<Vertex> ident: 0, label: category, properties: {'name': 'Programming'}
Dumping and loading data
Ruruki is an in-memory database, so all the data goes away when your program
exits. However, Ruruki provides dump()
and load() methods that
will let you record a graph to disk and load it again later.
- Dumping your graph so that you can use it later.
>>> graph.dump(open("/tmp/graph.dump", "w"))
- Loading a dump file.
>>> graph.load(open("/tmp/graph.dump"))
Tutorial demo script
The above demo script can be found under ruruki/test_utils/tutorial_books_demo.py